 |
| Add caption |
Wednesday, August 24, 2016
What "Reply To All" Says about you
At work, we have the people who "Reply to All". You have them. Can't help themselves. Everyone needs to know what they have to say. Fun happens when everyone in an organization has at it, and tries to figure collectively why they are replying to so many emails. It happened at my school district, and I made a little infographic about what happened, and what you can say about the teachers in our district. Click for a full PDF of it.
Friday, August 19, 2016
Tools for 3D Printing in the Classroom
Many of the times I read about "What You Need" for 3D printing, and websites list tools and gadgets that add $100's to the price of an already expensive printer. I run the only 3D design AND printing class in San Diego for middle school kids (5th year now). We break a lot of things and need to fix them, and I don't trust them with $80 pliers. So below I have what we absolutely need, and it costs about $20.
Clockwise from the left corner:
Flat Paint Scraper : ($1.99) It is already super thin, but e sand the edge down to make it super thin and sharp. No need for a $20 "part remover", this thing takes kids banging on it, and never had to replace it.
Metric Angle Set ($4.99) : Everything on 3D printers is metric, and some are at funny angles. You need these.
Needle Nose Pliers ($0.99) : For grabbing filament stuck in an extruder, or BREAKING OFF SUPPORTS!!!
Razor Blade ($4.99 for 100, or $0.04 ea) : For fine detial work, or scraping off a build plate.
Tooth Brush ($FREE): Take an old one. Used to clean off the extruder gears (hobbed bolt) when there is a filament jam, which is all the time when letting kids change filament.
Reamer ($2.99) : For expanding holes that were printed with no tolerances, this makes quick work to make them bigger.
Set of NICE Ball Hex End Sockets [1.5, 2, 2.5, 3, 4mm] : ($4-$8 Each): So handy, and a bit more than the angle hex keys above them, but they are so nice, and they are rubber, and so nice to hold, and faster many times than the keys, and so nice....
Adjustable Wrench ($4.99) : For removing hot ends. Works most of the time. A 7mm wrench is also good, but this works for 90% of the things you need to do.
For the day to day use, there are specifics recommended by different suppliers. Here is what I have found to be as good or better.
Super Lube ($10.04) : This is what Makerbot send you in a little clear tube. This is the big version. It has lasted me 2 years for four machines used all day every day. It should last you forever. A little dab will do ya'.
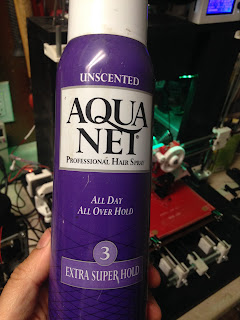
Aqua Net ($2.99 at CVS) : Many people swear by their ABS slurry, or glue stick, or blue tape, or kapton. If your machine is leveled correctly, this is by far the cheapest and best stuff. A can lasts two machines an entire year. Way cheaper than blue tape or kapton, and cleaner than glue sticks, and not as specific or carcinogenic as a slurry. Extra Super Hold of course.
Spare Nuts and Bolts: OK, so you may not need this many, but when kids start taking apart printers, they have to keep track of parts. Then they start losing parts. Then you get mad. Then everyone gets mad because the printer does not work because it is missing a nut. Then you save the day with your spare set you have. I but every bolt from 5mm to 40mm in 3 and 4mm sizes (m3x5 - m4x40). It has saved many headaches.
DVOM : When you really want to diagnose stuff, you need this. If you don't know what it does, don't worry, don't buy it.
Thursday, September 27, 2012
Temperature in my Classroom
I thought it would be neat to see how hot it gets each day in my class. I hooked an Netduino up to an DHT22 temperature and humidity sensor, and linked them online through COSM.com What you see is the graphs for temperature and humidity in my room.
Yes, the temperature gets to 90 almost every day. The humidity, for some reason, is very low. Weird. Share if you like it, or maybe pitch in for air conditioning for us :)
Yes, the temperature gets to 90 almost every day. The humidity, for some reason, is very low. Weird. Share if you like it, or maybe pitch in for air conditioning for us :)
Wednesday, September 12, 2012
Custom Webclip Icons
Many have asked how to create custom icons, and there was a cool website that did this for you, but alas, it is gone.
But, bookmarklets to the rescue.:)
Bookmarklets you say? Yes, little bits of javascript, saved as a bookmark, that execute when you click the bookmark. We are going to use one of these to change the generic home-screen icon that iOS uses when you try to "Bookmark to Home Screen"
Step 1- Make a generic bookmark. Heck, bookmark this page, and call it "Custom Icon"
Step 2- Copy this code:
javascript:var%20links=document.getElementsByTagName('head')[0].getElementsByTagName('link');for(var%20i=0;i%3Clinks.length;i++){if(links[i].getAttribute('rel')=='apple-touch-icon'){links[i].parentNode.removeChild(links[i])}; break;};var%20s=document.createElement('link');s.setAttribute('rel', 'apple-touch-icon');s.setAttribute('href',prompt('Touch icon URL?','http://'));document.getElementsByTagName('head')%5B0%5D.appendChild(s);void(s);
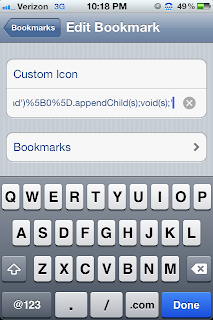
Step 3 - Open you bookmarks, and click edit. Then, click the three little bars next to the bookmark you just created "Custom Icon"
Step 4 - Delete the URL, and paste the code in its place.
BOOM!! Now your done!!
Step 5 - To make your own icon now, navigate to the picture you want to use as the icon. Copy its URL address.
Step 6 - Navigate to the page you want the custom icon for
Step 7 - Click the "Custom Icon" bookmark. It will prompt you for a URL, the URL of the custom pic. Paste it in.
It looks like nothing happened, but the pic for the website has now changed to your own creation.
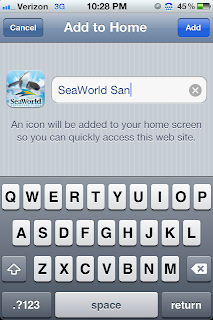
Step 8 - Bookmark to home screen, and you should see the pic you want as the icon.
Hooray, your done, and it will be much quicker next time you do it. Find the pic, save the URL. Go to the web page you want, click "Custom Icon" bookmark, paste URL, Bookmark to home screen.
Subscribe to:
Comments (Atom)


